Implementing DMARC on Alias Domains
- Matt Zaske
- November 30, 2020
- 6 minutes
A few weeks ago I crossed a tweet with some simple instructions for securing your "unused" email domains, specifically the few bits required to implement DMARC controls to prevent Bad Folks from using your domains to send spam emails. The short thread led to an awesome reference by the UK Government on the same process. I kept that tab open for a while with the intent to implement this at a point in the future.
And so, over the US Thanksgiving holiday, I rolled this out for myself. I have many vanity/variant domains as aliases of primary domains, which are configured as aliases for email receipt. Only my primary domains are configured for sending messages; most I manage through Google Workspace Admin, and to which I have added more complete DMARC configurations (I intend to write about proper configurations in the future). This post identifies the steps I took on the alias domains to prevent Bad Folks from spoofing messages on the "unused" domains. These domains aren't used for sending email, and such blanket records deliberately cause email delivery issues. Do NOT use these records on your proper email domains!
First off, I want Reporting
I went through the step of creating a distinct and valid account for receiving DMARC reports from the world. It's generally discouraged to have these sent to your primary addresses, as there can be an incredibly high volume of messages in certain circumstances. So a separate account it was, on a proper domain. I didn't see any guidance indicating a 'burner' account couldn't be used, though...
UPDATE ON "EXTERNAL" REPORTS:
While I was implementing DMARC on active domains, I discovered that there is indeed guidance and requirements for a "burner" account. Specifically, the recipient domain's DNS must have a specific type of TXT record to allow 'external' domains to send their DMARC reports. I will write about this in the companion post about implementing DMARC for Active Domains, since it's more useful reporting for active domains than inactive/unused/alias domains where we've set up this broad blocking.
Second, Get Familiar with DNS
All of the work necessary to implement these controls is done through DNS. As such, you'll have to both have access to edit your domains' DNS configurations, and be comfortable doing so. I have added verification command examples using dig to illustrate how a "properly" configured record would be verified.
A 30-second Primer on DMARC
DMARC itself is a sort of authentication framework built on top of the existing Sender Policy Framework (SPF) and DomainKeys Identified Mail (DKIM) specifications. As an example, my personal primary domain has been configured with DKIM for many years now; however, it lacked SPF records and DMARC controls until now. When all of these pieces are put together, they create a more robust mechanism to filter out and prevent email abuse.
1. Create an SPF Record
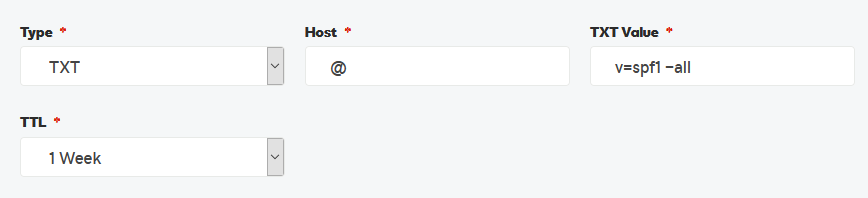
SPF records are basically the "allowable" sender list for email. The first step is to create a DNS TXT record for SPF, with a host of @, value of v=spf1 -all, and your preferred TTL. This record doesn't include any allowable senders:
Verify this change with dig (fictitious domain example.com):
$ dig example.com txt

; <<>> DiG <<>> example.com txt
;; global options: +cmd
;; Got answer:
;; ->>HEADER<<- opcode: QUERY, status: NOERROR, id: 7421
;; flags: qr rd ad; QUERY: 1, ANSWER: 2, AUTHORITY: 0, ADDITIONAL: 0
;; WARNING: recursion requested but not available

;; QUESTION SECTION:
;example.com.                    IN      TXT

;; ANSWER SECTION:
example.com.             0       IN      TXT     "v=spf1 -all"
2. Create a Keyless DKIM Record
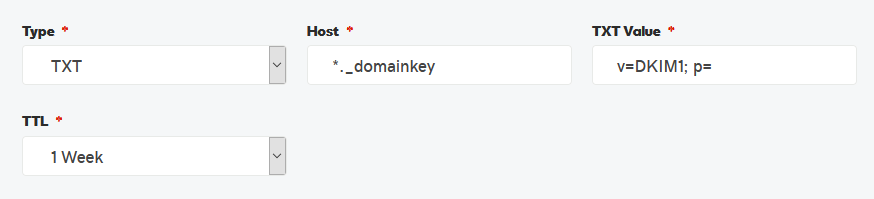
DKIM records include the public key component that recipients can use to decrypt messages sent from verified/vetted sources. By creating a DKIM record without a key, servers receiving fraudulent messages are much more likely to prevent delivery as it appears encryption is enabled for the domain. The second step is to create a DNS TXT record for DKIM, with a host of *._domainkey, value of v=DKIM1; p=, and your preferred TTL:
Verify this change with dig (fictitious domain example.com):
$ dig *._domainkey.example.com txt

; <<>> DiG <<>> *._domainkey.example.com txt
;; global options: +cmd
;; Got answer:
;; ->>HEADER<<- opcode: QUERY, status: NOERROR, id: 13958
;; flags: qr rd ra; QUERY: 1, ANSWER: 1, AUTHORITY: 0, ADDITIONAL: 1

;; OPT PSEUDOSECTION:
; EDNS: version: 0, flags:; udp: 4096
;; QUESTION SECTION:
;*._domainkey.example.com.       IN      TXT

;; ANSWER SECTION:
*._domainkey.example.com. 604800 IN      TXT     "v=DKIM1; p="
3. Create a DMARC Policy Record
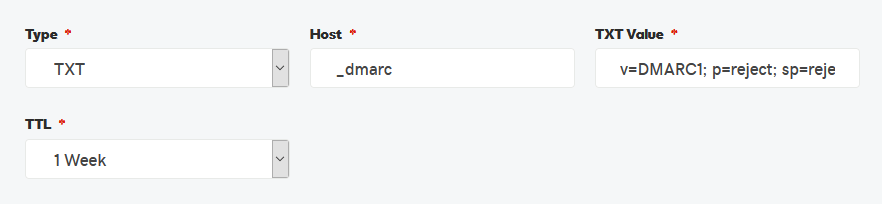
The DMARC policy record instructs receiving servers how to treat messages not passing SPF or DKIM controls. The third step is to create a DNS TXT record for DMARC, with a host of _dmarc, value of v=DMARC1; p=reject; sp=reject; adkim=s; aspf=s; rua=mailto:account@example.com, and your preferred TTL. This record instructs everything not passing SPF or DKIM to be rejected, and to send reports to the fictitious account@example.com address:
Verify this change with dig (fictitious domain example.com):
$ dig _dmarc.example.com txt

; <<>> DiG <<>> _dmarc.example.com txt
;; global options: +cmd
;; Got answer:
;; ->>HEADER<<- opcode: QUERY, status: NOERROR, id: 35359
;; flags: qr rd ad; QUERY: 1, ANSWER: 1, AUTHORITY: 0, ADDITIONAL: 0
;; WARNING: recursion requested but not available

;; QUESTION SECTION:
;_dmarc.example.com.             IN      TXT

;; ANSWER SECTION:
_dmarc.example.com.      0       IN      TXT     "v=DMARC1; p=reject; sp=reject; adkim=s; aspf=s; rua=mailto:account@example.com"
4. Create a blank MX Record (Optional)
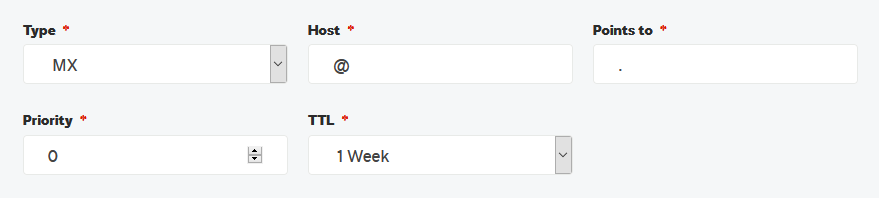
The focus of the aforementioned controls is to handle sent messages, and not their receipt or routing. DNS MX records relate to the routing and delivery of messages for a domain. If your domain isn't expected to receive email (or alias to another/primary domain), adding a blank MX record will effectively bounce all messages. The fourth and optional step is to create a blank DNS MX record with a host of @, priority of 0, value of ., and your preferred TTL:
Verify this change with dig (fictitious domain example.com):
$ dig example.com mx

; <<>> DiG <<>> example.com mx
;; global options: +cmd
;; Got answer:
;; ->>HEADER<<- opcode: QUERY, status: NOERROR, id: 20563
;; flags: qr rd ad; QUERY: 1, ANSWER: 1, AUTHORITY: 0, ADDITIONAL: 0
;; WARNING: recursion requested but not available

;; QUESTION SECTION:
;example.com.                    IN      MX

;; ANSWER SECTION:
example.com.             0       IN      MX      0 .
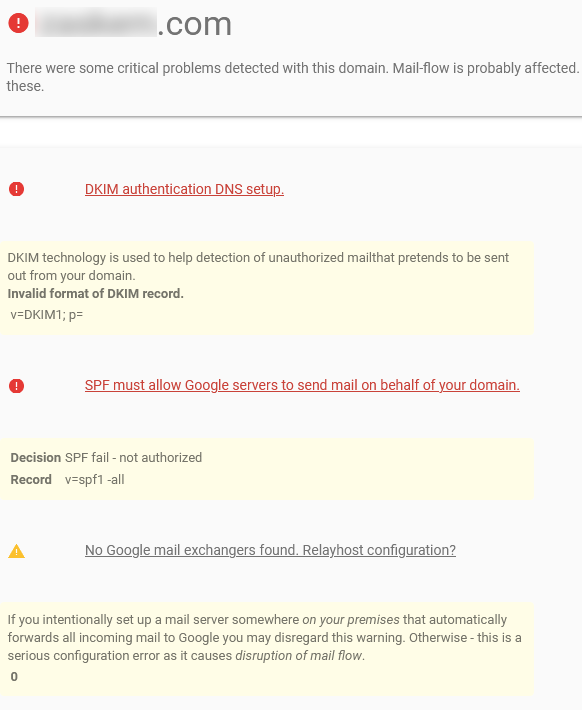
Final Step: A Little Validation
Using something like the Google Admin Toolbox for MX Checking, it's easy to verify if you've effectively 'broken' email routing for the domain. Note that in this case you want to see errors for DKIM, SPF, and MX (mail exchanger) as illustrated:
That's All!
By implementing some of these controls for domains you oversee, you can encourage good behavior (providers implementing DMARC and similar controls) and prevent/limit some bad behaviors like email spoofing. Remember, these pieces all work together; there's not a single item to implement (or not) to solve it all, but at least you can help reduce the chances of your unused domains being flagged for Bad Behavior. Good luck!
Recent Posts
Past Speaking Engagements
I was a speaker at MMSMOA, May 3-7, 2026!

I was a speaker at MMS Music City Edition, October 12-15, 2025!

I was a speaker at TCSMUG Autopilot/OSD Day, July 15, 2025!
![]()
I was a speaker at MMSMOA, May 4-8, 2025!
I was a speaker at BrainStorm K20 Wisconsin Dells, March 9-11, 2025!

I was a speaker at MMS Flamingo Edition, October 20-23, 2024!

I was a speaker at TCSMUG OSD Day, July 31, 2024!
![]()
I was a speaker at NWSCUG, July 19, 2024!
![]()
I was a speaker at MMSMOA, May 5-9, 2024!
I was a speaker at BrainStorm K20 Wisconsin Dells, March 10-12, 2024!
I was a speaker at MMS Miami Beach, October 29-November 1, 2023
